Posts Tagged ‘batteries’

Small things

Monday, April 20th, 2009

I ordered the wrong size lugs so I sent them back for smaller ones.  The screws for the batteries measures just over 5/16″ so I thought I needed to order the next size up – 3/8″.  Turns out the lugs, at least the ones I got, are oversized so they were 0.05″ too big.  The connections was a little sloppy so I’m going with the smaller size.

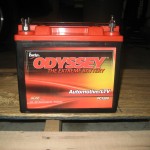
It works out well, because with the battery swap I’m going to need to use the SAE posts on top of the battery.  The new battery has both SAE terminals on top and screw post on the side.  If I want to put the batteries in rows front to back, the screws posts would not be accessible for the cable.

I also found a leak with the vacuum pump.  When I put the muffler on the o-ring slipped to the side and wasn’t sealing right.  While I had the reservior and pump off I added a pad beneath and to the side of the pump to keep it a little quieter.

Other progress was painting and bolting up the motor mounts.  I need 2 bushings and 2 more bolts and they’ll be done.  I should take some more pictures.

Battery Change & Steering

Tuesday, April 14th, 2009

I’ve decided it’s better to upsize my battery from a PC1200 to a PC1500 equivalent (more later).  I should add about 60% more range (42 ah to 68 ah) with only a 11lb per battery penalty (30%).  We’re also planning on cutting into the floor above the fuel tank and hanging the batteries there instead of trying to install them from underneath.  Maintaining them would be very difficult if they were underneath due to the weight (400 lbs).  With the new setup I’ll have an access hatch to easily check and tighten terminal connections, not to mention install the batteries one at a time.

I also received a motor to drive the power steering pump.  It’s from a scooter like the Razr.  I figure if it can push up to a 180 lb kid at 10 mph (rated at 2500 RPM) it should be able to run a pump, and hopefully the A/C too.  It’s meant for 24V and it’ll be on the 12V system so we’ll see how it goes.  It was a pretty cheap buy and even looks like it will couple to the PS pump pulley pretty easily. I tested it with a 9V battery and it spun right up so I’m hopeful it’ll do well with more juice on tap.

Small progress

Tuesday, March 24th, 2009

Not much change on the actual car, but I have been up to some stuff:

  • Made wood mockups of motor mounts and then sketched them up. I’ll remake them and assembly from the sketches to see if it still makes sense.
  • Thought a lot about the power steering and A/C pulley system.  They rotate opposite directions so it’s a little more involved than hoping.
  • Realized the placement of the battery terminals means that a cable won’t fit between the batteries unless I purposely use an odd battery arrangement.  I have an idea on solving that…
  • Got a new shipment of parts – battery lugs, plastic terminal covers, contactor, circuit breaker, fuse and holder
  • Found the oversized 40 amp fuse at a boat store
  • Found out the boat store has a cable crimper to make battery cables that customers are allowed to use, preferably if you bought your stuff there but they were pretty nice…

More later.

Battery box assembled

Thursday, February 26th, 2009

My parents were in town for the weekend so I got Dad to help me assemble the rear battery box. It will fit in the fuel tank void and clears the suspension components. I have about an inch extra width than I need so I may trim up some pieces and reassemble. It would provide additional buffer to the rear axle and reduce the weight by a small amount.

I may also go to a angle-iron tray as things progress. I like the idea of wood because it’s completely enclosed except the top. Dad had a good point about the wood being exposed to water so I’ll need to paint it something fancy in case I ever run somebody over and they get stuck down there. My habit whenever a pedestrian was in the way previously was to rev the engine so they’d hear me, I can’t do that anymore. Maybe I can modify my flux capacitor to shoot a bolt of lightning at them or something, just a little jolt to move them along.

Battery Pictures

Wednesday, February 11th, 2009

Here are some pictures of the battery and the layout for the rear. The piece of wood fit in the back, but I have some more test fits to do. I think I’ll go ahead and build it out of wood and see how it goes.

I also figured that the existing fual tank weighed about 125 lbs full. I’ll have 6 batteries at 40 lbs each plus the weight of the tray so I’m about double. It’ll need some additional supports to the frame.

Also of consideration is room for the battery chargers. I like the idea of twelve individual charger but haven’t thought about it enough yet. If I do go with a single charger I’ll plan on using a monitoring system to keep them level.

More good news – The adapter plate and hub should be machined in the next week, and a Raptor is on hold with my name on it, so I won’t have the 12 week expected lead time!

Battery Tray

Tuesday, February 10th, 2009

I worked on some drawings for a battery tray for the rear fuel tank area and am now confident about getting 6 in there. I’d suggest buying a sample of the battery you plan to use for actual dimensions. I have a lot more room than I thought based on the online dimensions. It’s easier to visual when you’ve seen the actual battery too. Heavier though.

Some other factors based on having the actual battery:

  • Depending on the terminals the height may be greater
  • I’m not sure how much clearance should be provided between the terminals and the metal frame, is there a potential (ha) for arcing, even if covered in plastic?
  • May provide more room to mount the batteries sideways, I’ll layout both options and mockup with wood

Maybe pics or scans of layout tomorrow.

Pretty accurate model

Sunday, February 8th, 2009

I unpacked the motor and was curious to see how well my model matched up to the real thing. It looks pretty good to me, so hopefully everything will fit like it should in the engine bay.

Model Comparision

Model Comparision

Here are some more pictures of the motor. I had a heck of a time finding photos of the drive end when I was trying to visualize how the adapter would work. I plan to take a few detailed shots of the motor and create a page for those to help out anyone considering a WarP 11.

This weekend I cleaned more gunk out of the engine bay. I’d like to remove the steering rack and get the k-member as clean as could be before placing the motor, but we’ll see. I’m still debating a manual steering to avoid a second motor that runs the power steering pump. From reading it seems those are best for skinny tires on drag cars and not daily drivers. I’ll still call a vendor and see what they think about it. The other alternative may be to run an electric pump instead of driving the mechanical pump with an electric motor, that may be more efficient.

I placed an order for the vacuum pump for the brakes. I’ll also need to tap into it for the A/C system because the vents change from dash to feet and windshield be vacuum. I’m not sure if that is as air-tight a system, so I may not want them attached. Not sure how I’d switch from floor to dash though, maybe a straw system I can suck on or something… I’ll worry about it more when this things gets out of the garage.

One day this week I’ll go by and pickup a battery I can use to begin laying out racks to hold them. Once I see the terminals I’ll be more comfortable ordering cabling and connectors and a crimping tool.

Patience

Thursday, December 18th, 2008

Lots of calling, emailing and list making. Motor has been ordered, hopefully the adapter and controller will be soon. Time to start listing all the other parts and quantities needed.

The 8 battery configuration won’t fit in the fuel tank location. There wasn’t enough clearance to the rear axle housing, especially once axle movement was considered. I still think I can fit 6 in there pretty easily.

Battery box model

Sunday, November 30th, 2008

Tonight I made a battery box model for the fuel tank location. It will be a tight fit, if at all. I opted to try the 8 battery layout from here, having the batteries on their end. I’m planning to use AGM so they can be in any location. I’ll need to find a battery locally that I can measure and ensure the manufacturer’s specs and my allowances will really work when including all the terminals and wiring.

Battery Sizing – November 15, 2008

Saturday, November 15th, 2008

The last step before ordering parts is making sure I can cram enough batteries in to make this work. I like the numbers on Odyssey so I chose one that was a little low on amp-hours but was small. I’d like to keep the batteries out of the interior if at all possible so that limits me to the fuel tank location and within the engine bay.

I decided the best way would be to make a model of a battery out of cardboard for a rough idea of how many would fit. After getting a feel for the areas I thought to measure the maximum space available and determine the largest battery I can fit there while still reaching my voltage goal. As long as the weight penalty isn’t too great the larger batteries should provide for either better range or increased pack life since I would be drawing them down less.

My brother came over and we measured the fuel tank and engine bay, as well as the t-top well in case we have to go interior. The fuel tank location is a trapezoid when viewed from the side and has obstructions on the underside including the rear gear housing, axle and panhard bars. I had removed some suspension pieces and almost included that area in the available space. I also need to allow clearance for the rear axle to move up over bumps and general suspension loading since the car will only get heavier from here.

Attached are some layouts I made of a possible battery box. It looks like I can fit 6 in a 2×3 pattern of larger batteries sitting right-side up. I also think I can fit eight smaller batteries sitting on end. The length is very close to my available height to the rear axle so I need to verify the clearance and movement.