Complete battery racks
Thursday, July 2nd, 2009The rear racks are in. All 13 batteries can be stowed. I’ll clean up the metal and paint the rear racks then load them up for cable measuring.
Yay!
The rear racks are in. All 13 batteries can be stowed. I’ll clean up the metal and paint the rear racks then load them up for cable measuring.
Yay!
A little more progress fitting the rear battery rack last night. We may be able to finish up tomorrow with the tray and then will need to make a cover that will open to access (and show off) the batteries.
With the front complete I can do all the wiring and find out if I’m missing anything. I think I’ll add another contactor so there is one on both the positive and negative leads of the battery pack. That provides redundancy in turning on and shutting down the power to the controller.
I also need to add a manual disconnect, preferably a circuit breaker that can be activated easily from the driver’s seat in the event of an overload from the batteries or runaway motor or any other expensive misfortune. I’ve only seen one that is commonly used and I’m not sure if it provides enough protection to not nuisance trip. We’ll, I’ve seen others but they cost a whole lot more. Right now I’m leaning towards using it anyway and replacing it with a beefier unit if it comes to that.
Remaining items:
Is moving within a month under E-power reasonable? As luck would have it work is going to be very busy so hopefully I’ll keep making progress. Pictures are overdue, next week maybe.
As my wife says it takes almost as long to post happenings here as it does to do happenings.
13 hours in this week doing battery racks. I know because I got a timecard from Fabricator Mike. I got another couple in this weekend touching up some stuff.
Yesterday and tonight we finished up the remaining front battery rack. Finding mounting points was difficult because the A/C compressor and lines were in the way. Even with 2 bars supporting the tray, the batteries have a slight amount of give to them. They won’t be going anywhere though unless I pop a wheelie and slam back down. Then maybe.
With that done I can complete my front layout, probably work on that this weekend. Tomorrow we begin to hack out the back for the 8 battery rack. Fabricator Mike has been looking forward to that.
Mike the Fabricator (are you keeping track?) came by today and worked up the first of three battery racks. It turned out pretty well. It took several hours and it was hot today. Florida is even in a heat advisory. Fortunately wife went out to Publix and came back with a case of water and 2 – 64 oz of Gatorade. We about finished them off and ran the fridge out of ice, donchaknow. (We just watched “New in Town” where someone from Florida went to Minnesota during the winter. It was entertaining, and Harry Connick Jr. sure looked good with that beard.
So it was hot but we got a good amount done. I also cut and crimped 8 battery cables. That makes all of the side-by-side battery cables complete. I want to wait until we have the racks in so I can get a more accurate length for the long runs. Here are a couple of pictures from today.
First I used my clamping table to force the handles of the cutter to close. 2/0 cable is pretty tough, so I got Louie the Cat to help.
That was pretty difficult so I tried a hammer on the garage floor.
This picture shows the difference in ends from slowly cutting with the clamp and fast with the hammer. The hammer cut is on the left, slow clamping on the right. I liked the hammer better because it looks more symmetrical and left the tiny wires more at the same length. It was also easier and faster. Slowly cutting seemed to crush the wires into the middle.
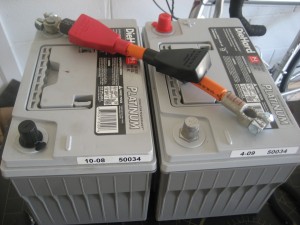
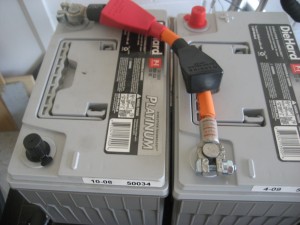
It is useful to test fit the orientation of the terminals with your actual battery layout. The 2/0 cable is flexible, but it is better to not make it twist over short distances if you don't have to.
This is a trick I learned. Once you remove the outer sheath of the wire it wants to spread apart. You have to get all the tiny wires into the terminal so I realized that this smaller the length of exposed cable, the easier it would be to slip it into the lug.
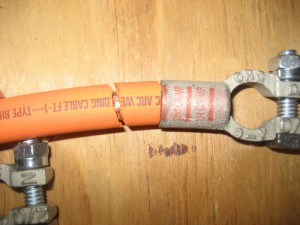
Slip the terminal over the still contained wires then use a razor to slice almost all the way through the cable on the side.
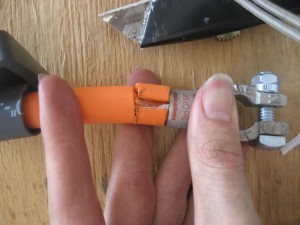
Hold the terminal in place and then peel the outer wrap off the cable. Slide the terminal all the way onto the cable and crimp.
Here are a couple that show the battery rack being assembled.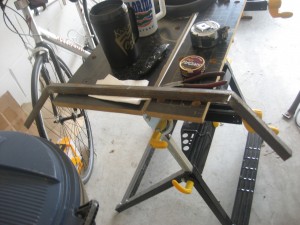
Neighbor Mike has a big Ford Expedition so we expeditioned ourselves to our local Sears Auto Center and picked up 13 Diehard Platinum P1s last Saturday. They are equivalent to the Oddysey PC1500 I was eyeing up, but about $50 less each so I’ll give them a go. The best part was customers weren’t allowed in the work area unless they had eye protection. Neighbor Mike jumped right in and helped loading, but in doing so took the only extra pair of safetly glasses they had. So I scoped out the vending machines while they loaded 650 lbs of batteries.
I did help unload and then moved them into the garage on a pallet though. I’d never heard it before but people are saying that leaving a battery on concrete will drain it. One idea I thought made sense is that the concrete remains cooler than the ambient air so the electrolyte separates at the bottom. The slight differential created eddy currents which drain the battery. I remember hearing about those at UF, but I don’t know what they are. I do know they aren’t used to build roads and were not on the PE exam.
I haven’t heard anything from the vendor I ordered everything from earlier this month. Normally they ship very fast so I’m assuming that some of the parts are not in stock. I know the crimper I will be renting had a few days delay, but that may ship separately since it has an extra shipping charge. I’ll probably call tomorrow to see what’s going on. I also wasn’t able to order the mk2d regulators online so I asked them so send me an invoice for them separately and I want to followup there as well.
On a good note I’ve been directed to a local metal fabricator who is interested in the project and will be coming by sometime this week to look over everything. He’ll be helping with the battery racks, including the new one that will require cutting out the floor above the fuel tank and raising it about an inch. We’ll also provide an access hatch to install and maintain the batteries.
I started to layout the front batteries now that I’ve decided to go bigger. A simple math correction revealed that 156 / 12 = 13, not 14, as I’d previously thought. So I only need to cram 13 batteries in the car, meaning 8 out back and 5 under hood.
I’ve been thinking more about a charger and battery monitoring. I like the look and cost of the paktrakr, but it doesn’t link into the Manzanita I’m considering. Not too big a deal I think, I’ll just scan through the batteries before charging to make sure they’re all pretty equal so no single battery gets overcharges. But I say that now not having to check battery voltages everyday. The system that Manzanita makes costs more, but would make sure everything plays together nicely.
More research is needed, but I’d like to order it pretty soon. I like the Manzanita because it has variable everything it seems, so different battery packs, input voltages, etc don’t matter.
Check it out, we made a custom battery cable today.
I got my new shipment of battery terminals on Thursday. I mailed the parts back for exchange on Saturday, all the way to Utah. I’m very happy with the service I’ve received from EVSource. After today’s experience, I think I’ll need to place another order with them to take advantage of their tool rental program. Here’s the scoop:
I’d just come home with a pair of high-leverage Klein cable cutters from Home Depot. I stopped at Sears a few times to get a pair and their cable cutting selection was mostly cleared out, so I was happy to find them at Home Depot, meant I didn’t have to mail-order and wait.
Anyhow, I figured I had my new terminals, terminal covers, wire (seems to be called “cable” once it’s 2/0 size so I better start to if I want to seem like I’m professional-like), heatshrink and cable cutters. Might as well make a battery cable, right? I thought so.
I pulled up the specs on my batteries, some paper and some theory a guy name Pythagoras figured up. Take the distance between the terminals squared plus the width of the battery squared and then desquared and I got about 10.85″. I added a smidge for a buffer and measured roughly 12″ out of my 20′ coil of wire.
Back out came my Klein high-leveraged 9″ cable cutters. I found my mark and clamped on. About 15 seconds of claming later I figured I needed to figure something else out since I couldn’t seem to leverage enough on my high-leveragers. I pulled out some 1′ socket extensons and deep sockets that fit snug on the handles and gave that contraption a squeeze, but to no avail.
I then thought to put the handle between the gap on my Craftsman clamping professional work table. That did the trick pretty easy – basically like putting the handles inside a vise. So now I had a cut to length cable. Used the cable cutters to slice through the outer sheath of the cable and pulled it off.
Assembled it all together so we had the terminal covers on, then the heat shrink, then the terminals. Then I realized I had the black terminal cover on the side with the positive terminal. Good thing it wasn’t crimped yet – you need to QC these things.
I’d previously found a boat store locally that provides a benchmounted crimper for making battery terminals. So we loaded into the gasmobile and drove on up there. Once there I took a good look at the crimper and realized it wasn’t quite big enough for 2/0. Figured I give it a whirl anyways.
It closed down pretty easy – I’d even say it was high-leveraged. We took a look at the terminal and it actually went through the lug and exposed the copper cable a tiny bit. We went ahead and did the other side too being careful not to cut through. I’ll keep a close eye on the terminal and make sure it doesn’t get hotter than the others indicating the connection isn’t very good.
We headed to the battery store after that to see how Pythagoras did with that math. We set 2 batteries wide to side like they’ll be in Trans Amped and the battery was about 4″ longer than it needs to be… That’s more than a smidge so I blame Pythagoras. Lesson learned so I made a note of how long the next cables should be.
Got home, fired up my new heat gun (located in the paint section, not heat shrink section of our neighborhood Ace) and shrunk the wrap around the crimps. All done.
Overall it should go pretty well since I figured out the kinks. The only other thing was the terminal covers fit snug on the cable, so when the heat shrink is added it gets mighty tight, Barn. Sorry, we’re watching Andy Griffith right now.
Also bought some misc. wiring and connecters for my low voltage system.