Archive for the ‘doing’ Category

This doesn’t look good

Sunday, November 29th, 2009

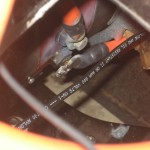
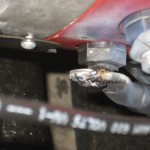
Tonight I was looking under the hood just to check stuff out and came across this. This is my S2 motor terminal and the 2/0 lug that was bolted to it. I imagine it got loose and welded itself into this mess.

I’ll have to see if it will unscrew or not and figure out how to get it back together.

Removed some stuff

Sunday, November 15th, 2009

I removed the scooter motor and the power steering pump to eliminate some weight and clean up the engine bay.  I was going to remove the A/C compressor and the entire front bracket since I need to figure out a way to get that to work.  Problem is we welded the bracket to hold the bracket that holds the A/C in place and the gaps between the frame and the welded piece are smaller than the parts that need to come out.

So I think I can get to it by removing the sway bar and coming out the bottom but I’ll need to lift the car back up to do that.

One oddity I found was that disconnecting the negative most battery cable did not reduce the voltage between the contactors to zero as I’d expect.  Until I disconnected the battery regulator lead it didn’t drop, so i assume there are capacitors on the regulators which hold charge so you could still get a slight zap from those.

It’s getting cold here in Florida so I may bump up the heater replacement.

Longer drive

Thursday, October 29th, 2009

Tonight we went out to a pizzeria that is 5.8 Google miles away. The pack wasn’t quite topped off from a quick lap around the neighborhood the other night so we started at 166 V. Finished voltage was 155.3 so we used 11V to go 11.6 miles, about a volt per mile which is easy to remember. I don’t understand why everyone says 300 watts per mile, I suppose because pack voltages vary.

So instead of saying I need 300 watts of power to go 1 mile, to me it makes more sense to say I’ll consume 1 Volt to go one mile. Voltage is potential so I like the idea of saying I’ve got 30 volts to use at 20% discharge so at 1 V/mi I can go 30 miles. Less as the pack is depleted, but about that.

Besides, who has a meter for watts installed in the car to tell them how much fuel is left, seems everyone uses a voltmeter for “fuel” and an ammeter for instantaneous use.

Interior Cleanup

Saturday, October 10th, 2009

Today I upgraded the switch that turns on the negative contactor. It’s a bright red, lighted rocker switch that should be easy to remember to turn off. I also reinstalled the interior console and rerouted the emergency rip cord to come out by the driver’s right knee. I’ll attach a red handle or something to it soon.

Also cut off a couple bundles from the engine wiring harness. I think I only cut wires I don’t need. I don’t have most of the sensors anymore so I don’t see why I would need them, but they may go to something I wasn’t thinking about. I did that so I could easily run the plugs to the transmission. Now the speedometer should work, as well as the reverse lockout.

Another cruise

Monday, September 28th, 2009

So I got everything back together and we were able to do two laps in the neighborhood today.  It went much smoother with the flywheel vibrations taken out.  The rear suspension stiffening helped out but there is still some clunking and binding when first starting out.  The car is back on the ground so I’ll squirm under there and measure my angles again later this week.

A good idea would have been to measure them before we pulled the engine, as well and the ride height.  Troubleshooting will consist of adjusting the angle of the motor itself via the motor and transmission mounts and then adjusting the ride height by increasing or decreasing pressure in the rearairbags.

I’m sure a full suspension refurbishing and some subframe connectors would help too, but that will have to come later.  As my wonderful wife says, this is the project that never ends.  So I have to keep coming up with more stuff to do, right?

Reassembled

Sunday, September 27th, 2009

What a work weekend. Yesterday I reinstalled the clutch assembly and partially bolted up the transmission. Also removed the old power rack and installed the new manual steering rack. There was a little more to it than I expected and the new tie rods didn’t align correctly. I’ll have a pro fix that for me.

Today I finished the transmission install, put the driveshaft and torque arm back on, reassembled the rear suspension to complete the air bag install and put the car back on solid ground. The batteries are fully charged and tomorrow we’ll go for a test drive to see how the new parts smooth things out. I spun up the motor with the balanced clutch assembly and it seemed smooth.

The driveline angles are somewhat better so hopefully that problem is solved also. We’ll find out tomorrow, weather permitting.

Maiden Voyage was a go!

Thursday, September 3rd, 2009

Hood on, tires pumped and away we went.

Right around 7:00 we backed her out of the garage and went for a quick trip down the street.  The car moaned and ground about not being moved in 1.5 years but it at least went.  Our first design flaw was uncovered as the motor and transmission promptly rotated towards the passenger side about 5 degrees.  The shifter can only go into first and second right now.  I know a way to remake one of the motor braces to have more resistance to rotation pretty easily – weekend project I guess.

Overall we went about a mile and my wife got to go for a ride.  I’ll edit and upload some videos soon.

We’ve also experienced another surplus in the budget.  My wife bet my brother a quarter it would work and won!

Afterwards the pack voltage was the same (173) as before, so it didn’t drain too much which is certainly good given the short distance.  We might get 15 miles out of the pack yet.  I’m anxious to see what a fully charged pack and solid mounts would let it do.  I didn’t get on it too hard but it zipped along ok in 2nd.

The regulators gave me a little concern because they were all showing red meaning undervoltage since last charge.  I realized (I think) that they must have sagged during acceleration (V=IR) and increased current draw below 10 V.  Most of the green lights flashed at me though as the voltage came back up.  I’ll check them all out tomorrow and make sure all my connections are good.

Whew.

Regulator wiring

Monday, August 31st, 2009

I bought a crimper and 20 6-pin connectors tonight at Ace, along with a new fuse for the power steering pump.  It blew a 15 amp so I’m trying a 25 amp.  I’ll need to upgrade my wiring to a thicker guage if it’s pulling that much.

So I’ll remake the phone cable connections and flip the wires so that are all “TDBR” – tang down, blue right.

Just thought, I bought 20 because I have 13 batteries.  So I need 26.  Oh wait, I can reuse 13 of them because half of the terminals are correct.  Whew.  My wife thinks I go to Ace to often, plus they are out for now.

It Worked! Almost…

Monday, August 31st, 2009

I resolved the issues with the controller.  I wired the negative contactor to a switch installed in the dash.  Flipping that on connects the negative HV to the controller.  My Dc/DC is tied to the open side of the contactor as well, so it kicks in then as well.  That’s a nice benefit to the switch because I can power all my 12V accessories off the pack with the controller still off.

Turning the key to run signals the controller to precharge and then close the postive contactor.  We hooked it all up and it worked.  Everything was wired except the open side of the contactor to the controller because I don’t have the circuit breaker in place yet.  Lacking a manual disconnect, I’d have no way to shut down the controller if something were to go awry.  Tomorrow I’ll see about adding in the circuit breaker and making the full connection.  Then we could go for a test drive.  Oh, about the almost…

Everything powered up like it should, but when I wiggled the steering wheel the motor turning the power steering pulley stopped under the load.  Rats.  The tires are a little flat and the car was stationary so that’s the worst situation the motor would be in, but I don’t know that it will work with the car in motion.  I’m leaning towards a test run tomorrow anyway.  The most difficult part, if the power steering doesn’t work, would be getting it back in the garage.

We will see.

It didn’t work

Sunday, August 30th, 2009

Today we made the final connections and turned the key.  Nada.  We fiddled with it for a couple of hours and gave up, planning to call the manufacturer of the controller tomorrow for some verification of the wiring diagram.

Basically I turned the key and the contactors didn’t close.  They are controlled by the Raptor 1200 controller, which precharges the internal components prior to sending the command to the contactors to open, dumping a voltage spike across the capacitors.  It wasn’t sending that command.

We tested the contactors by applying voltage across the leads and they are both operational, good.

I realized tonight that I have two contactors – one positive and one negative.  This is for redundancy and provides two electronic means to shutoff the motor by simply turning the key.  What I realized tonight was that the controller must have a continuous connection to the negative lead of the main pack to precharge.  That means you can’t have the controller running both contactors.  I think if I power the negative contactor off the chassis and key on, then the controller will follow normal sequence and close the positive lead on it’s own.

Tomorrow I will sit at work and watch the clock, waiting to go home and try again.  Tick tock tick tock.